Fine-tuning Alpaca and LLaMA: Training on a Custom Dataset
Welcome to the tutorial on fine-tuning Alpaca LoRa! In this tutorial, we will explore the process of fine-tuning Alpaca LoRa for detecting sentiment in Bitcoin tweets.
Join the AI BootCamp!
Ready to dive into the world of AI and Machine Learning? Join the AI BootCamp to transform your career with the latest skills and hands-on project experience. Learn about LLMs, ML best practices, and much more!
The repository of Alpaca LoRa1 provides code for reproducing the Stanford
Alpaca results using low-rank adaptation (LoRA). Included is an Instruct model
similar in quality to text-davinci-003. The code can be extended to the 13b,
30b, and 65b models, and Hugging Face’s PEFT2 and Tim Dettmers’
bitsandbytes3 are used for efficient and inexpensive fine-tuning.
We will walk through the entire process of fine-tuning Alpaca LoRa on a specific dataset, starting from the data preparation and ending with the deployment of the trained model. The tutorial will cover topics such as data processing, model training, and evaluation using popular natural language processing libraries such as Transformers and Hugging Face. Additionally, we will cover how to deploy and test the model using the Gradio app.
In this tutorial, we will be using Jupyter Notebook to run the code. If you prefer to follow along, you can access the notebook here: open the notebook
Notebook setup
The alpaca-lora1 GitHub repository offers a single script (finetune.py) to
train a model. In this tutorial, we will leverage this code and adapt it to work
seamlessly within a Google Colab environment.
Let’s begin by installing the necessary dependencies from the repository:
!pip install -U pip
!pip install accelerate==0.18.0
!pip install appdirs==1.4.4
!pip install bitsandbytes==0.37.2
!pip install datasets==2.10.1
!pip install fire==0.5.0
!pip install git+https://github.com/huggingface/peft.git
!pip install git+https://github.com/huggingface/transformers.git
!pip install torch==2.0.0
!pip install sentencepiece==0.1.97
!pip install tensorboardX==2.6
!pip install gradio==3.23.0
After installing the dependencies, we will proceed to import all the necessary libraries and configure the settings for matplotlib plotting:
import transformers
import textwrap
from transformers import LlamaTokenizer, LlamaForCausalLM
import os
import sys
from typing import List

from peft import (
    LoraConfig,
    get_peft_model,
    get_peft_model_state_dict,
    prepare_model_for_int8_training,
)

import fire
import torch
from datasets import load_dataset
import pandas as pd

import matplotlib.pyplot as plt
import matplotlib as mpl
import seaborn as sns
from pylab import rcParams

%matplotlib inline
sns.set(rc={'figure.figsize':(10, 7)})
sns.set(rc={'figure.dpi':100})
sns.set(style='white', palette='muted', font_scale=1.2)

DEVICE = "cuda" if torch.cuda.is_available() else "cpu"
DEVICE
Data
We will be using the BTC Tweets Sentiment dataset4, which is available on Kaggle and contains around 50,000 tweets related to Bitcoin. To clean the data, I removed all tweets starting with ‘RT’ or containing links. Let’s now download the dataset:
!gdown 1xQ89cpZCnafsW5T3G3ZQWvR7q682t2BNWe can use Pandas to load the CSV:
df = pd.read_csv("bitcoin-sentiment-tweets.csv")
df.head()| date | tweet | sentiment | |
|---|---|---|---|
| 0 | Fri Mar 23 00:40:40 +0000 2018 | @p0nd3ea Bitcoin wasn’t built to live on exchanges. | 1 |
| 1 | Fri Mar 23 00:40:40 +0000 2018 | @historyinflicks Buddy if I had whatever series of 19th diseases Bannon clearly has I’d want to be a bitcoin too. | 1 |
| 2 | Fri Mar 23 00:40:42 +0000 2018 | @eatBCH @Bitcoin @signalapp @myWickr @Samsung @tipprbot patience is truly a virtue | 0 |
| 3 | Fri Mar 23 00:41:04 +0000 2018 | @aantonop Even if Bitcoin crash tomorrow morning, the technology it’s still revolutionary. A way of simplifying it. #Ihavetobepartofthis | 0 |
| 4 | Fri Mar 23 00:41:07 +0000 2018 | I am experimenting whether I can live only with bit coins donated. Please cooperate. | 1 |
Our dataset has around 1900 tweets.
The sentiment labels are represented numerically, where -1 indicates a negative sentiment, 0 indicates a neutral sentiment, and 1 indicates a positive sentiment. Let’s have a look at their distribution:
df.sentiment.value_counts() 0.0 860
1.0 779
-1.0 258
Name: sentiment, dtype: int64df.sentiment.value_counts().plot(kind='bar');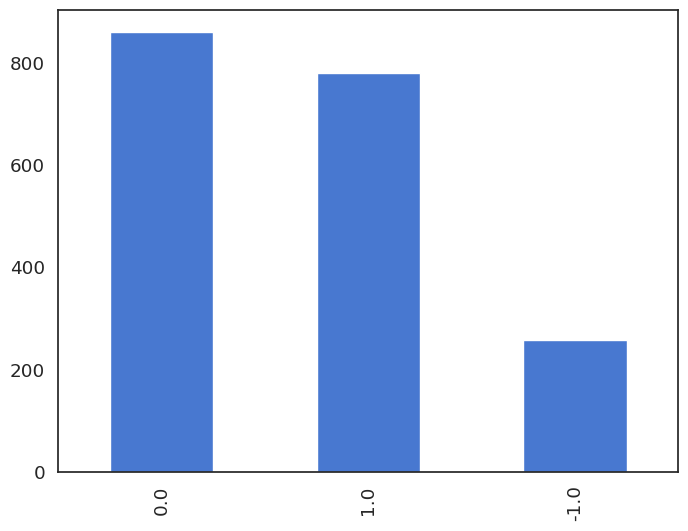
The distribution of negative sentiment is significantly lower, and it should be considered when assessing the performance of the fine-tuned model.
Build JSON Dataset
The format of the dataset5 in the original Alpaca repository consists of a
JSON file that has a list of objects with instruction, input, and output
strings.
Let’s convert the Pandas dataframe into a JSON file that adheres to the format in the original Alpaca repository:
def sentiment_score_to_name(score: float):
    if score > 0:
        return "Positive"
    elif score < 0:
        return "Negative"
    return "Neutral"

dataset_data = [
    {
        "instruction": "Detect the sentiment of the tweet.",
        "input": row_dict["tweet"],
        "output": sentiment_score_to_name(row_dict["sentiment"])
    }
    for row_dict in df.to_dict(orient="records")
]

dataset_data[0]
{
"instruction": "Detect the sentiment of the tweet.",
"input": "@p0nd3ea Bitcoin wasn't built to live on exchanges.",
"output": "Positive"
}Lastly, we will save the generated JSON file to use it for training the model later on:
import json
with open("alpaca-bitcoin-sentiment-dataset.json", "w") as f:
   json.dump(dataset_data, f)
Model Weights
Although the original Llama model weights are not available, they were leaked and subsequently adapted for use with the HuggingFace Transformers library. We’ll use the decapoda-research6 weights:
BASE_MODEL = "decapoda-research/llama-7b-hf"

model = LlamaForCausalLM.from_pretrained(
    BASE_MODEL,
    load_in_8bit=True,
    torch_dtype=torch.float16,
    device_map="auto",
)

tokenizer = LlamaTokenizer.from_pretrained(BASE_MODEL)

tokenizer.pad_token_id = (
    0  # unk. we want this to be different from the eos token
)
tokenizer.padding_side = "left"
This code loads the pre-trained Llama model using the LlamaForCausalLM class
from the Hugging Face Transformers library. The load_in_8bit=True parameter
loads the model using 8-bit quantization to reduce memory usage and improve
inference speed.
The code also loads the tokenizer for the same Llama model using the
LlamaTokenizer class, and sets some additional properties for padding tokens.
Specifically, it sets the pad_token_id to 0 to represent unknown tokens, and
sets the padding_side to “left” to pad sequences on the left side.
Dataset
Now that we have loaded the model and tokenizer, we can proceed to load the JSON
file we saved earlier using the load_dataset() function from the HuggingFace
datasets library:
data = load_dataset("json", data_files="alpaca-bitcoin-sentiment-dataset.json")
data["train"]
Dataset({
features: ['instruction', 'input', 'output'],
num_rows: 1897
})Next, we need to create prompts from the loaded dataset and tokenize them:
def generate_prompt(data_point):
    return f"""Below is an instruction that describes a task, paired with an input that provides further context. Write a response that appropriately completes the request.  # noqa: E501
### Instruction:
{data_point["instruction"]}
### Input:
{data_point["input"]}
### Response:
{data_point["output"]}"""


def tokenize(prompt, add_eos_token=True):
    result = tokenizer(
        prompt,
        truncation=True,
        max_length=CUTOFF_LEN,
        padding=False,
        return_tensors=None,
    )
    if (
        result["input_ids"][-1] != tokenizer.eos_token_id
        and len(result["input_ids"]) < CUTOFF_LEN
        and add_eos_token
    ):
        result["input_ids"].append(tokenizer.eos_token_id)
        result["attention_mask"].append(1)

    result["labels"] = result["input_ids"].copy()

    return result

def generate_and_tokenize_prompt(data_point):
    full_prompt = generate_prompt(data_point)
    tokenized_full_prompt = tokenize(full_prompt)
    return tokenized_full_prompt
The first function generate_prompt takes a data point from the dataset and
generates a prompt by combining the instruction, input, and output values. The
second function tokenize takes the generated prompt and tokenizes it using the
tokenizer defined earlier. It also adds an end-of-sequence token to the input
sequence and sets the label to be the same as the input sequence. The third
function generate_and_tokenize_prompt combines the first two functions to
generate and tokenize the prompt in one step.
The last step of data preparation involves splitting the dataset into separate training and validation sets:
train_val = data["train"].train_test_split(
    test_size=200, shuffle=True, seed=42
)
train_data = (
    train_val["train"].map(generate_and_tokenize_prompt)
)
val_data = (
    train_val["test"].map(generate_and_tokenize_prompt)
)
We want 200 examples for the validation set and apply shuffling to the data. The
generate_and_tokenize_prompt() function is applied to every example in the
train and validation set to generate the tokenized prompts.
Training
The training process requires several parameters which are mostly derived from the fine-tuning script in the original repository:
LORA_R = 8
LORA_ALPHA = 16
LORA_DROPOUT= 0.05
LORA_TARGET_MODULES = [
    "q_proj",
    "v_proj",
]

BATCH_SIZE = 128
MICRO_BATCH_SIZE = 4
GRADIENT_ACCUMULATION_STEPS = BATCH_SIZE // MICRO_BATCH_SIZE
LEARNING_RATE = 3e-4
TRAIN_STEPS = 300
OUTPUT_DIR = "experiments"
We can now prepare the model for training:
model = prepare_model_for_int8_training(model)
config = LoraConfig(
    r=LORA_R,
    lora_alpha=LORA_ALPHA,
    target_modules=LORA_TARGET_MODULES,
    lora_dropout=LORA_DROPOUT,
    bias="none",
    task_type="CAUSAL_LM",
)
model = get_peft_model(model, config)
model.print_trainable_parameters()
trainable params: 4194304 || all params: 6742609920 || trainable%: 0.06220594176090199We initialize and prepare the model for training with the LORA algorithm, which is a form of quantization that can reduce model size and memory usage without significant loss in accuracy.
LoraConfig7 is a class that specifies the hyperparameters for the LORA
algorithm, such as the regularization strength (lora_alpha), the dropout
probability (lora_dropout), and the target modules to be compressed
(target_modules).
For the training process, we’ll use the Trainer class from the Hugging Face Transformers library:
training_arguments = transformers.TrainingArguments(
    per_device_train_batch_size=MICRO_BATCH_SIZE,
    gradient_accumulation_steps=GRADIENT_ACCUMULATION_STEPS,
    warmup_steps=100,
    max_steps=TRAIN_STEPS,
    learning_rate=LEARNING_RATE,
    fp16=True,
    logging_steps=10,
    optim="adamw_torch",
    evaluation_strategy="steps",
    save_strategy="steps",
    eval_steps=50,
    save_steps=50,
    output_dir=OUTPUT_DIR,
    save_total_limit=3,
    load_best_model_at_end=True,
    report_to="tensorboard"
)
This code creates a TrainingArguments object which specifies various settings
and hyperparameters for training the model. These include:
- gradient_accumulation_steps: Number of updates steps to accumulate gradients before performing a backward/update pass.
- warmup_steps: Number of warmup steps for the optimizer.
- max_steps: The total number of training steps to perform.
- learning_rate: The learning rate for the optimizer.
- fp16: Use 16-bit precision for training.
data_collator = transformers.DataCollatorForSeq2Seq(
    tokenizer, pad_to_multiple_of=8, return_tensors="pt", padding=True
)
DataCollatorForSeq2Seq is a class from the Transformers library that creates
batches of input/output sequences for sequence-to-sequence (seq2seq) models. In
this code, a DataCollatorForSeq2Seq object is instantiated with the following
parameters:
- pad_to_multiple_of: An integer representing the maximum sequence length, rounded up to the nearest multiple of this value.
- padding: A boolean indicating whether to pad the sequences to the specified maximum length.
Now that we have all the necessary components, we can proceed with training the model:
trainer = transformers.Trainer(
    model=model,
    train_dataset=train_data,
    eval_dataset=val_data,
    args=training_arguments,
    data_collator=data_collator
)
model.config.use_cache = False
old_state_dict = model.state_dict
model.state_dict = (
    lambda self, *_, **__: get_peft_model_state_dict(
        self, old_state_dict()
    )
).__get__(model, type(model))

model = torch.compile(model)

trainer.train()
model.save_pretrained(OUTPUT_DIR)
After instantiating the Trainer, the code sets use_cache to False in the
model’s config, and creates a state_dict for the model using the
get_peft_model_state_dict() function, which prepares the model for training
using low-precision arithmetic.
Then, the torch.compile() function is called on the model, which compiles the
model’s computation graph and prepares it for training using PyTorch 2.
The training process lasted approximately 2 hours on A100. Let’s examine the results on Tensorboard:
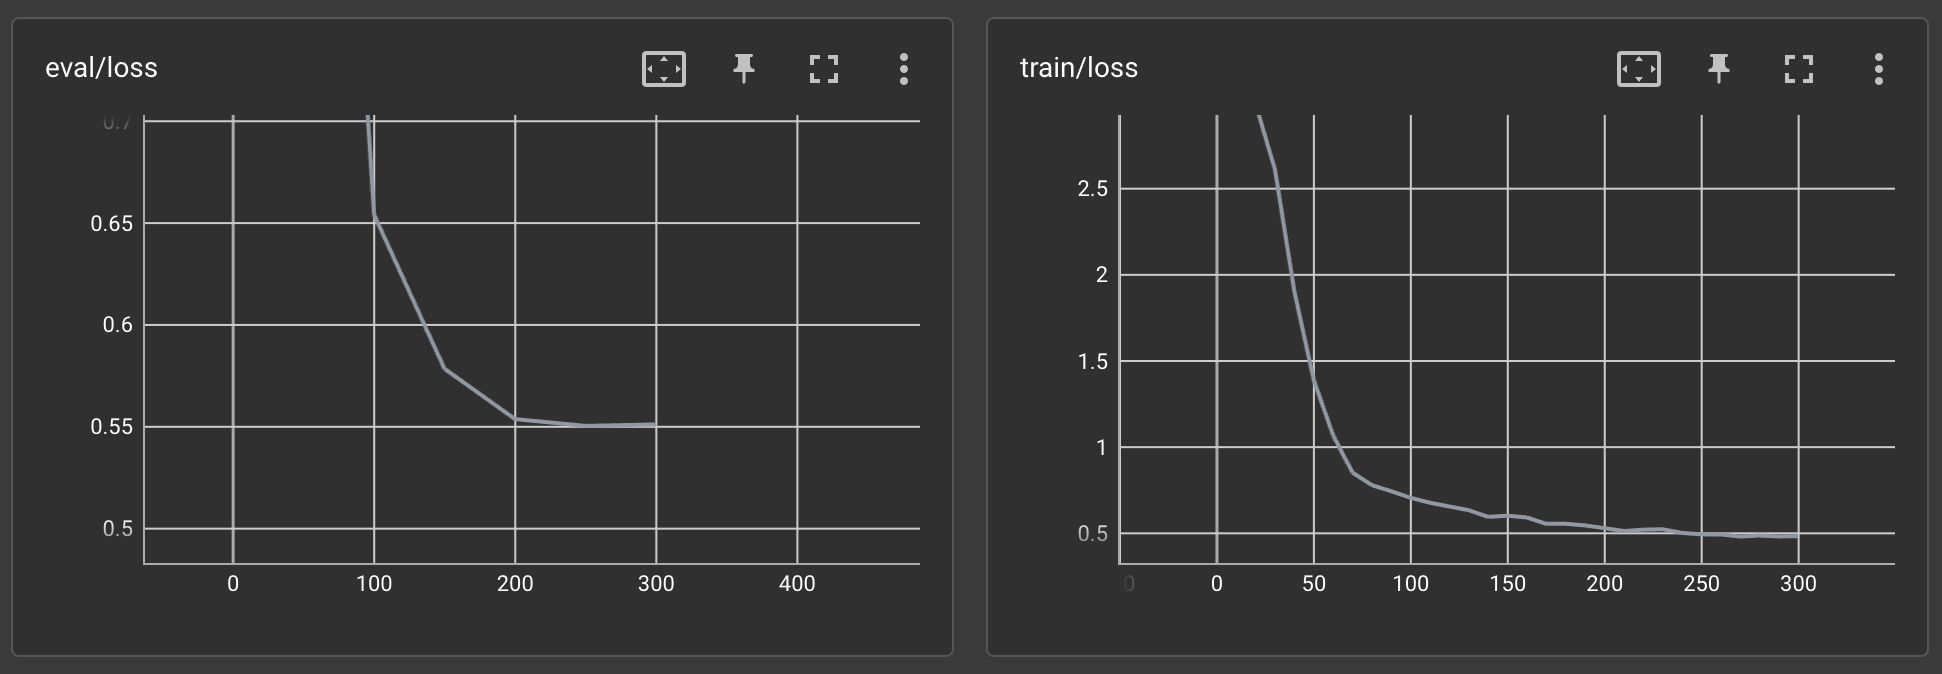
The training loss and the evaluation loss seem to be decreasing steadily. And that was on the first try!
We will upload the trained model to the Hugging Face Model Hub for easy reusability:
from huggingface_hub import notebook_login

notebook_login()

model.push_to_hub("curiousily/alpaca-bitcoin-tweets-sentiment", use_auth_token=True)
Inference
We will begin by duplicating the repository and then utilize the generate.py
script to test the model:
!git clone https://github.com/tloen/alpaca-lora.git
%cd alpaca-lora
!git checkout a48d947
The Gradio app launched by the script will allow us to utilize the weights of our model:
!python generate.py \
    --load_8bit \
    --base_model 'decapoda-research/llama-7b-hf' \
    --lora_weights 'curiousily/alpaca-bitcoin-tweets-sentiment' \
    --share_gradio
Here’s a look at our app:
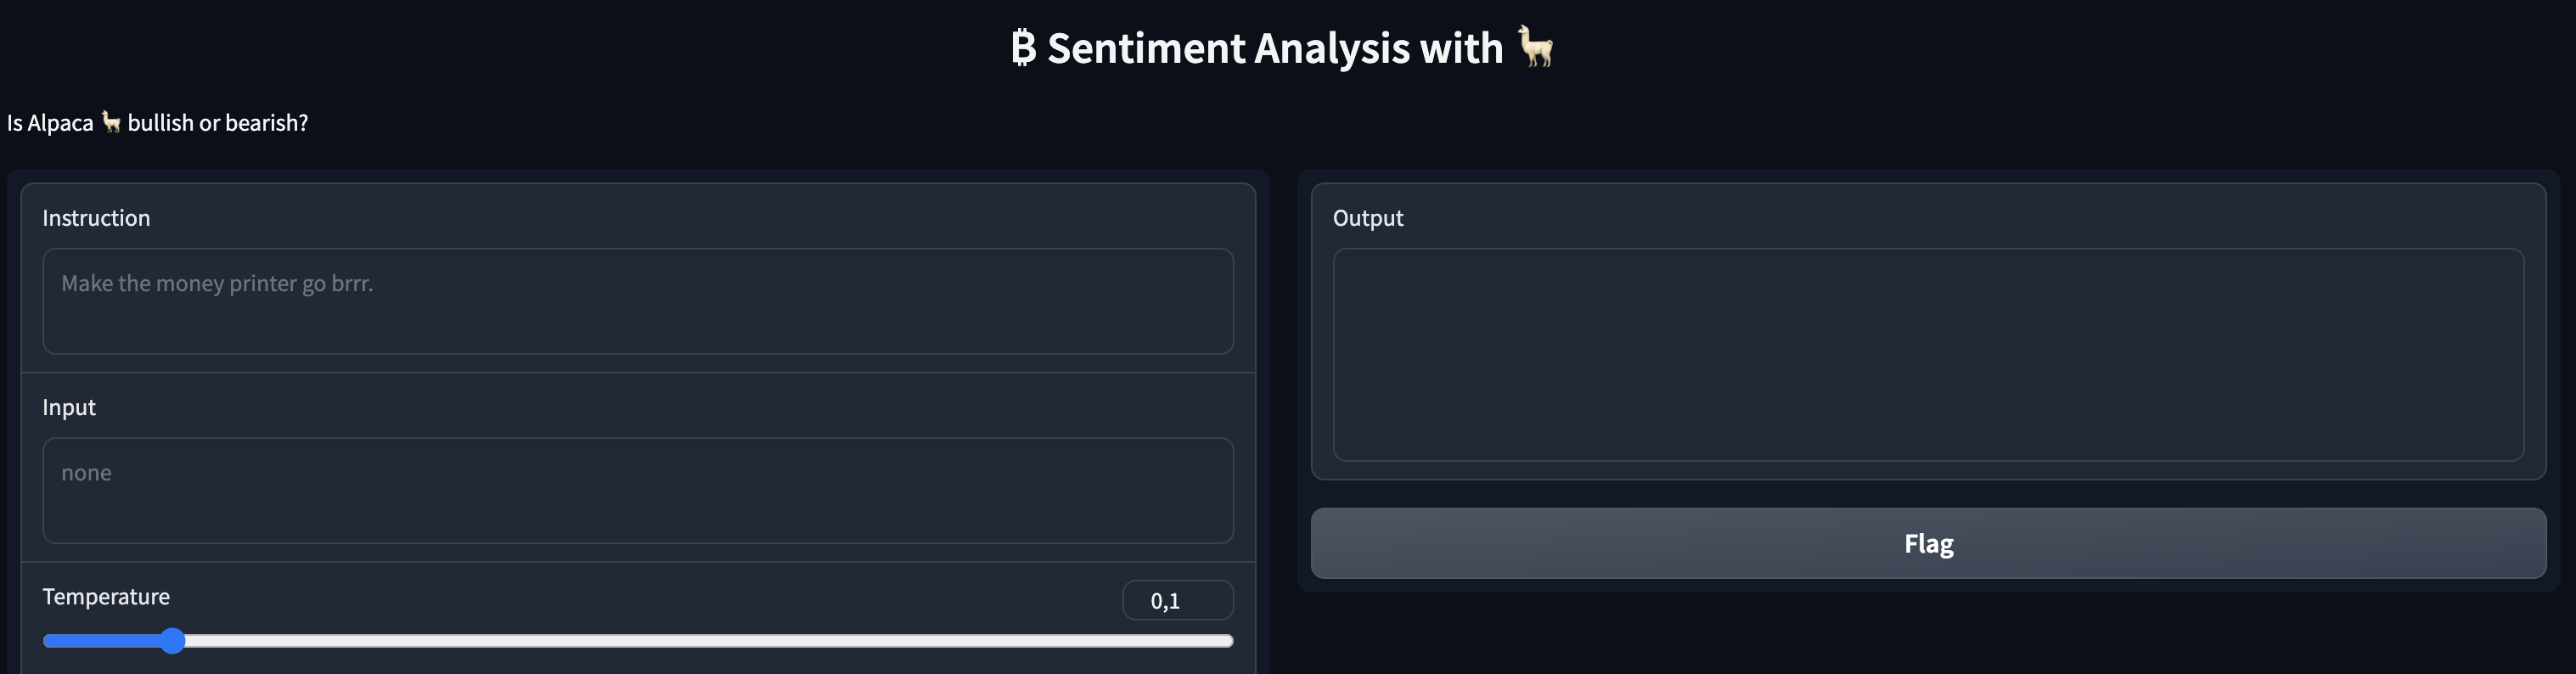
Go ahead and test the model!
Conclusion
In conclusion, we have successfully fine-tuned the Llama model using Alpaca LoRa methods for detecting sentiment in Bitcoin tweets. We have used the Hugging Face Transformers library and the Hugging Face datasets library for loading and preprocessing the data, as well as the Transformers trainer for training the model. Finally, we have deployed our model to the Hugging Face model hub and demonstrated how to use it in a Gradio app.
Join the The State of AI Newsletter
Every week, receive a curated collection of cutting-edge AI developments, practical tutorials, and analysis, empowering you to stay ahead in the rapidly evolving field of AI.
I won't send you any spam, ever!