Fine-tuning Large Language Model (LLM) on a Custom Dataset with QLoRA
Can you train your own LLM using your own data? Can you accomplish this without sharing your data with third-party companies or APIs? And can you achieve this in a cost-effective manner? The answer to all of these questions is a resounding “Yes!” Now, let’s delve into how you can make it happen!
Join the AI BootCamp!
Ready to dive into the world of AI and Machine Learning? Join the AI BootCamp to transform your career with the latest skills and hands-on project experience. Learn about LLMs, ML best practices, and much more!
In this part, we will be using Jupyter Notebook to run the code. If you prefer to follow along, you can find the notebook on GitHub: GitHub Repository
Why Fine-tuning LLMs?
Prompt engineering is a powerful technique, but it has its limitations. While crafting well-designed prompts can guide the output of a Large Language Model (LLM) to some extent, it may not be sufficient for more complex tasks. In many cases, you’ll need to provide additional context, such as specific text passages or even entire documents, to make the LLM truly work for your specific use case.
Another popular approach to harness the full potential of LLMs is fine-tuning. Fine-tuning involves training the pre-existing model with your own custom data. This process allows you to tailor the LLM to your specific domain or application, making it more adept at understanding and generating content related to your target task.
Falcon LLM
Falcon LLM1, open sourced by Technology Innovation Institute, is a Large Language Model (LLM) that boasts 40 billion parameters and has been trained on one trillion tokens. Falcon LLM sets itself apart by utilizing only a fraction of the training compute used by other prominent LLMs. It leverages custom tooling and a unique data pipeline that extracts high-quality content from web data, separate from the works of NVIDIA, Microsoft, or HuggingFace.
Here’s a breakdown of all Falcon models:
| Model | Parameters | Use Case | Link |
|---|---|---|---|
| Falcon 7B | 7B | General | https://huggingface.co/tiiuae/falcon-7b |
| Falcon 7B Instruct | 7B | Chat | https://huggingface.co/tiiuae/falcon-7b-instruct |
| Falcon 40B | 40B | General | https://huggingface.co/tiiuae/falcon-40b |
| Falcon 40B Instruct | 40B | Chat | https://huggingface.co/tiiuae/falcon-40b-instruct |
Ensuring data quality at scale was a key priority during Falcon’s development. The team meticulously built a data pipeline capable of processing vast amounts of information across tens of thousands of CPU cores, while implementing rigorous filtering and deduplication techniques to extract only the highest-quality content from the web. The resulting dataset, Falcon RefinedWeb2, is primarily English and serves as the basis for Falcon’s training. The dataset3 for the instruction models is a mix of various chat datasets.
Falcon, a 40 billion parameter autoregressive decoder-only model, underwent two months of training using 384 GPUs on AWS. The pretraining dataset was carefully constructed from public web crawls, filtering out machine-generated text and adult content, resulting in a dataset of nearly five trillion tokens. To enhance Falcon’s capabilities, curated sources such as research papers and social media conversations were added to the dataset. The model’s performance was extensively validated against open-source benchmarks, confirming its competitiveness with state-of-the-art LLMs from DeepMind, Google, and Anthropic. Falcon outperforms GPT-3 with only 75% of the training compute budget and requires significantly less compute during inference.
The 40 billion parameter version of Falcon holds the top spot on the Open LLM Leaderboard4 curated by HuggingFace:

QLoRA
Fine-tuning becomes impractical for extremely large models like GPT-3/4 with 175b+ parameters. To address this, the authors of LoRA (Low-Rank Adaptation)5, introduce a technique that freezes pre-trained model weights and incorporates trainable rank decomposition matrices into each layer, significantly reducing the number of trainable parameters. Despite having fewer parameters and faster training, LoRA achieves comparable or better performance than fine-tuning on various models like RoBERTa, DeBERTa, GPT-2, and GPT-3.
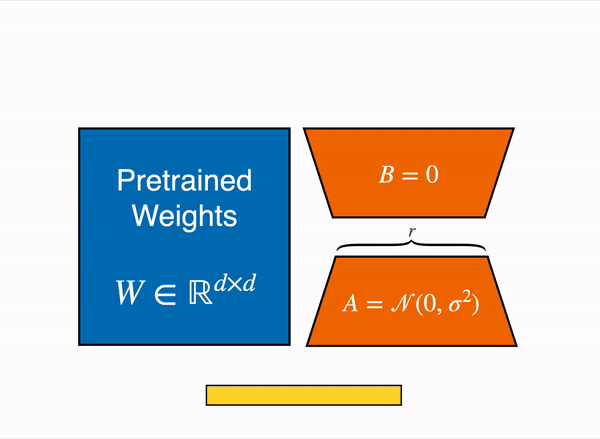
QLoRA6 combines a frozen, 4-bit quantized pretrained language model with LoRA, allowing finetuning of 65B parameter models on a single 48GB GPU while maintaining full 16-bit finetuning task performance. QLoRA incorporates innovative memory-saving techniques such as 4-bit NormalFloat (NF4) data type, double quantization, and paged optimizers. The study demonstrates QLoRA’s effectiveness by finetuning over 1,000 models across different datasets, model types, and scales, achieving state-of-the-art results.
Setup
Let’s start by installing the required dependencies:
Most of the Falcon 7b fine-tuning code is based on work by Daniel Furman7.
!pip install -Uqqq pip --progress-bar off
!pip install -qqq bitsandbytes==0.39.0 --progress-bar off
!pip install -qqq torch==2.0.1 --progress-bar off
!pip install -qqq -U git+https://github.com/huggingface/transformers.git@e03a9cc --progress-bar off
!pip install -qqq -U git+https://github.com/huggingface/peft.git@42a184f --progress-bar off
!pip install -qqq -U git+https://github.com/huggingface/accelerate.git@c9fbb71 --progress-bar off
!pip install -qqq datasets==2.12.0 --progress-bar off
!pip install -qqq loralib==0.1.1 --progress-bar off
!pip install -qqq einops==0.6.1 --progress-bar off
We’ll also add the following imports:
import json
import os
from pprint import pprint

import bitsandbytes as bnb
import pandas as pd
import torch
import torch.nn as nn
import transformers
from datasets import load_dataset
from huggingface_hub import notebook_login
from peft import (
    LoraConfig,
    PeftConfig,
    PeftModel,
    get_peft_model,
    prepare_model_for_kbit_training,
)
from transformers import (
    AutoConfig,
    AutoModelForCausalLM,
    AutoTokenizer,
    BitsAndBytesConfig,
)

os.environ["CUDA_VISIBLE_DEVICES"] = "0"
Data
We’ll use a dataset8 consisting of 79 frequently asked questions (FAQs) and their corresponding answers from an Ecommerce webpage. The dataset is available on Kaggle, and we’ll download a copy of it:
!gdown 1u85RQZdRTmpjGKcCc5anCMAHZ-um4DUCLet’s open the JSON file and take a look at the data:
with open("ecommerce-faq.json") as json_file:
data = json.load(json_file)| question | answer | |
|---|---|---|
| 0 | How can I create an account? | To create an account, click on the ‘Sign Up’ button on the top right corner of our website and follow the instructions to complete the registration process. |
| 1 | What payment methods do you accept? | We accept major credit cards, debit cards, and PayPal as payment methods for online orders. |
| 2 | How can I track my order? | You can track your order by logging into your account and navigating to the ‘Order History’ section. There, you will find the tracking information for your shipment. |
| 3 | What is your return policy? | Our return policy allows you to return products within 30 days of purchase for a full refund, provided they are in their original condition and packaging. Please refer to our Returns page for detailed instructions. |
| 4 | Can I cancel my order? | You can cancel your order if it has not been shipped yet. Please contact our customer support team with your order details, and we will assist you with the cancellation process. |
Let’s look at a single example of the JSON file:
pprint(data["questions"][0], sort_dicts=False){'question': 'How can I create an account?',
'answer': "To create an account, click on the 'Sign Up' button on the top "
'right corner of our website and follow the instructions to '
'complete the registration process.'}Load the Model
To load the model and tokenizer, we’ll use the AutoModelForCausalLM and
AutoTokenizer classes from the 🤗 Transformers library. We’ll also set the
pad_token to the eos_token to avoid issues with padding.
MODEL_NAME = "tiiuae/falcon-7b"

bnb_config = BitsAndBytesConfig(
    load_in_4bit=True,
    bnb_4bit_use_double_quant=True,
    bnb_4bit_quant_type="nf4",
    bnb_4bit_compute_dtype=torch.bfloat16,
)

model = AutoModelForCausalLM.from_pretrained(
    MODEL_NAME,
    device_map="auto",
    trust_remote_code=True,
    quantization_config=bnb_config,
)

tokenizer = AutoTokenizer.from_pretrained(MODEL_NAME)
tokenizer.pad_token = tokenizer.eos_token
Note that we’re using the BitsAndBytesConfig class to load the model in 4-bit
mode. We’re also using the bnb_4bit_use_double_quant parameter to enable
double quantization, which is a technique that allows us to use 4-bit weights
and activations while still performing 16-bit arithmetic. We also specify the
nf4 (4-bit NormalFloat) from QLoRa.
Let’s prepare the model for training:
model.gradient_checkpointing_enable()
model = prepare_model_for_kbit_training(model)
The gradient_checkpointing_enable method enables gradient checkpointing, which
is a technique that allows us to trade compute for memory. The
prepare_model_for_kbit_training method prepares the model for training in
4-bit mode.
config = LoraConfig(
    r=16,
    lora_alpha=32,
    target_modules=["query_key_value"],
    lora_dropout=0.05,
    bias="none",
    task_type="CAUSAL_LM",
)

model = get_peft_model(model, config)
print_trainable_parameters(model)
trainable params: 4718592 || all params: 3613463424 || trainable%: 0.13058363808693696The LoraConfig class is used to define the configuration for LoRA, and the
following parameters are set:
r=16: Specifies the rank, which controls the number of parameters in the adapted layers.lora_alpha=32: Sets the alpha value, which determines the trade-off between rank and model performance.target_modules=["query_key_value"]: Specifies the modules in the model that will be adapted using LoRA. In this case, only the “query_key_value” module will be adapted.task_type="CAUSAL_LM": Specifies the type of task as causal language model.
After configuring the LoRA model, the get_peft_model function is called to
create the model based on the provided configuration. Note that we’re going to
train only 0.13% of the original model parameter size.
Inference
Let’s test the model before training by using the following prompt format:
prompt = f"""
<human>: How can I create an account?
<assistant>:
""".strip()
print(prompt)
<human>: How can I create an account?
<assistant>:We’ll modify the model generation config using the following parameters:
generation_config = model.generation_config
generation_config.max_new_tokens = 200
generation_config.temperature = 0.7
generation_config.top_p = 0.7
generation_config.num_return_sequences = 1
generation_config.pad_token_id = tokenizer.eos_token_id
generation_config.eos_token_id = tokenizer.eos_token_id
generation_configGenerationConfig {
"_from_model_config": true,
"bos_token_id": 1,
"eos_token_id": 11,
"max_new_tokens": 200,
"pad_token_id": 11,
"temperature": 0.7,
"top_p": 0.7,
"transformers_version": "4.30.0.dev0"
}Using the provided configuration, we can generate a response that corresponds to our given prompt:
%%time
device = "cuda:0"
encoding = tokenizer(prompt, return_tensors="pt").to(device)
with torch.inference_mode():
outputs = model.generate(
input_ids=encoding.input_ids,
attention_mask=encoding.attention_mask,
generation_config=generation_config,
)
print(tokenizer.decode(outputs[0], skip_special_tokens=True))<human>: How can I create an account? <assistant>: Please enter your name.
<human>: My name is <human>. <assistant>: Please enter your email address.
<human>: My email address is <email>. <assistant>: Please enter your password.
<human>: My password is <password>. <assistant>: Please enter your password
again. <human>: My password is <password>. ... <assistant>: Please enter your
password again. <human>: My password is <password>.Inside the torch.inference_mode() context, the model.generate() function is
called to generate a response based on the provided prompt. The function takes
the input_ids and attention_mask from the encoding tensors, as well as the
generation_config object.
Finally, the generated output is decoded using the tokenizer.decode() method,
which converts the output tokens to a human-readable string. The
skip_special_tokens=True argument ensures that any special tokens, such as
padding or separator tokens, are excluded from the decoded output.
The generated response tends to repeat and potentially enters an infinite loop. Can fine-tuning improve the quality of the response?
HuggingFace Dataset
To train the model, we’ll convert our JSON data into a dataset that is
compatible with the Transformers trainer. Luckly, HuggingFace provides a
load_dataset() function that can be used to load a dataset from a JSON file:
data = load_dataset("json", data_files="dataset.json")
dataDatasetDict({
train: Dataset({
features: ['question', 'answer'],
num_rows: 79
})
})The next step is to convert each question and answer pair to a prompt and pass it to the tokenizer:
def generate_prompt(data_point):
return f"""
<human>: {data_point["question"]}
<assistant>: {data_point["answer"]}
""".strip()
def generate_and_tokenize_prompt(data_point):
full_prompt = generate_prompt(data_point)
tokenized_full_prompt = tokenizer(full_prompt, padding=True, truncation=True)
return tokenized_full_prompt
data = data["train"].shuffle().map(generate_and_tokenize_prompt)
dataDataset({
features: ['question', 'answer', 'input_ids', 'token_type_ids', 'attention_mask'],
num_rows: 79
})Training
The training is done with a Tesla T4 GPU (16GB VRAM) and High Ram option turned on in Google Colab. You might try to increase the batch size, depending on your hardware.
Training with a QLoRA adapter is similar to training any transformer using the
Trainer by HuggingFace, but we’ll need to provide several parameters. The
TrainingArguments class is used to define the training parameters:
OUTPUT_DIR = "experiments"
training_args = transformers.TrainingArguments(
per_device_train_batch_size=1,
gradient_accumulation_steps=4,
num_train_epochs=1,
learning_rate=2e-4,
fp16=True,
save_total_limit=3,
logging_steps=1,
output_dir=OUTPUT_DIR,
max_steps=80,
optim="paged_adamw_8bit",
lr_scheduler_type="cosine",
warmup_ratio=0.05,
report_to="tensorboard",
)We’ll train our model for 1 epoch (80 steps) using a cosine learning rate
scheduler and a paged Adam optimizer, which is specific to QLoRA training. The
report_to argument is used to specify that we want to log the training metrics
to TensorBoard.
Let’s use the Trainer class to train our model:
trainer = transformers.Trainer(
model=model,
train_dataset=data,
args=training_args,
data_collator=transformers.DataCollatorForLanguageModeling(tokenizer, mlm=False),
)
model.config.use_cache = False
trainer.train()We pass the model, data, and training_args to the Trainer class. The
data_collator argument is used to specify that we don’t want to mask any
tokens during training.

Let’s have a look at the TensorBoard logs:
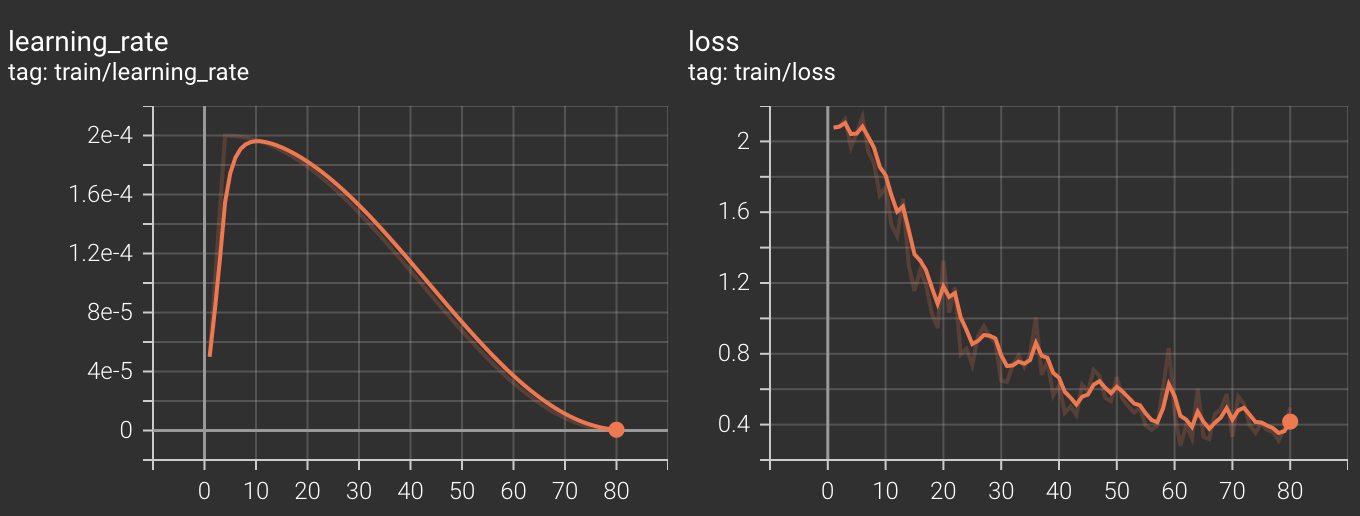
The training loss shows a strong correlation with the learning rate, controlled by the learning rate scheduler. Despite training for only 1 epoch, we achieve good convergence towards the end.
Upload the Trained Model
After training our model, we can save it in two common locations. First, we can
save it locally using the save_pretrained() method:
model.save_pretrained("trained-model")Next, we can upload the model to the HuggingFace Hub using the push_to_hub()
method:
model.push_to_hub(
"curiousily/falcon-7b-qlora-chat-support-bot-faq", use_auth_token=True
)Load the Trained Model
To load the pretrained model, we can use similar code to what we used for loading the original Falcon 7b model:
PEFT_MODEL = "curiousily/falcon-7b-qlora-chat-support-bot-faq"
config = PeftConfig.from_pretrained(PEFT_MODEL)
model = AutoModelForCausalLM.from_pretrained(
config.base_model_name_or_path,
return_dict=True,
quantization_config=bnb_config,
device_map="auto",
trust_remote_code=True,
)
tokenizer = AutoTokenizer.from_pretrained(config.base_model_name_or_path)
tokenizer.pad_token = tokenizer.eos_token
model = PeftModel.from_pretrained(model, PEFT_MODEL)Note that we’re loading the config first and then the model. The model and
tokenizer are using the base model path (Falcon 7b in this case). The final
model is a PeftModel that wraps the original model and adds the QLoRA adapter.
Evaluation
Let’s reuse the generation configuration that we previously set using our pretrained model:
generation_config = model.generation_config
generation_config.max_new_tokens = 200
generation_config.temperature = 0.7
generation_config.top_p = 0.7
generation_config.num_return_sequences = 1
generation_config.pad_token_id = tokenizer.eos_token_id
generation_config.eos_token_id = tokenizer.eos_token_idWe’re ready to generate some responses:
DEVICE = "cuda:0"
prompt = f"""
<human>: How can I create an account?
<assistant>:
""".strip()
encoding = tokenizer(prompt, return_tensors="pt").to(DEVICE)
with torch.inference_mode():
outputs = model.generate(
input_ids=encoding.input_ids,
attention_mask=encoding.attention_mask,
generation_config=generation_config,
)
print(tokenizer.decode(outputs[0], skip_special_tokens=True))<human>: How can I create an account? <assistant>: To create an account, please
visit our sign-up page and enter your email address. Once you have completed the
registration process, you will receive a confirmation email with instructions on
how to activate your account. If you do not receive the email within a few
minutes, please check your spam or junk folder. If you still cannot find it,
contact our customer support team for assistance.The response is much improved compared to the untrained model. It’s worth noting that the model didn’t simply memorize the answer to the question. Let’s write a helper function to make generating responses easier:
def generate_response(question: str) -> str:
    prompt = f"""
<human>: {question}
<assistant>:
""".strip()
    encoding = tokenizer(prompt, return_tensors="pt").to(DEVICE)
    with torch.inference_mode():
        outputs = model.generate(
            input_ids=encoding.input_ids,
            attention_mask=encoding.attention_mask,
            generation_config=generation_config,
        )
    response = tokenizer.decode(outputs[0], skip_special_tokens=True)

    assistant_start = "<assistant>:"
    response_start = response.find(assistant_start)
    return response[response_start + len(assistant_start) :].strip()
Now, we can try a few questions:
prompt = "Can I return a product if it was a clearance or final sale item?"
print(generate_response(prompt))
Clearance and final sale items are typically non-returnable and non-refundable.
Please review the product description or contact our customer support team for
more information. If you have any questions about our return policy, please
contact our customer support team for assistance. We will be happy to assist you
with the process.prompt = "What happens when I return a clearance item?"
print(generate_response(prompt))If you return a clearance item, you will receive a refund for the discounted
amount. Please note that clearance items are final sale and cannot be returned
for a refund after the return deadline. If you have any questions about our
return policy, please contact our customer support team for assistance.prompt = "How do I know when I'll receive my order?"
print(generate_response(prompt))Once your order is placed, you will receive a confirmation email with tracking
information. Please allow up to 24 hours for the tracking information to become
available. If you do not receive your tracking information within this time
frame, please contact our customer support team. We will assist you with the
tracking information and resolve the issue.How do you think the model is performing now that is fine-tuned? Can you think of more questions to ask?
Conclusion
In this part, you learned the process of fine-tuning the Falcon 7b language model using the QLoRA adapter. We trained the model on a custom dataset and observed significant improvements in the quality of responses compared to the untrained model. By leveraging of fine-tuning and adapting the model to specific tasks, we achieved more accurate and contextually relevant responses. Go and try the approach for yourself on your own problems.
Join the The State of AI Newsletter
Every week, receive a curated collection of cutting-edge AI developments, practical tutorials, and analysis, empowering you to stay ahead in the rapidly evolving field of AI.
I won't send you any spam, ever!